

Updated: July 18th, 2023
Using the Unreal Engine 5 (UE5) Matrix City Sample we created a cinematic hyperlapse. This method uses sequencer, keyframes, and custom blueprints to pull off a photo-real hyperlapse quickly!
Check out a quick overview and the final result below!
The Tutorial
Unreal Engine 5 has revolutionized the world of real-time rendering, offering unprecedented levels of detail and photorealism. One exciting feature that has caught the attention of content creators and filmmakers is the ability to simulate the effect of a hyperlapse right in engine.
And for those of you that maybe aren’t familiar with the term, a hyperlapse is a type of time-lapse photography that sequences complex or long-distance camera movements highlighting the passage of time in a dynamic and visually captivating manner. Typically, this is achieved by moving the camera a short distance after every photo, fortunately with Unreal Engine it’s a lot less labour intensive.
In this tutorial, we'll dive into the step-by-step process of creating a hyperlapse in Unreal Engine 5 to bring your scenes to life and unlock a whole new level of cinematic storytelling.
To get ourselves started, we're going to be using the city sample pack from the Unreal Engine Marketplace.
Once you have the project open, let's go ahead and open up the big city level map. Once it loads, let's move around to your starting point. This is a very similar process to how you'd shoot a hyperlapse in real life. The key here is to find a focal point that you can stay locked on for the duration of the hyperlapse.
For this, I'm going to choose the building at the end of the frame. I'm going to place the camera low just so we can see more motion blur as the camera's moving.

Once you're ready to go with your starting point, we're going to go ahead and create a new CineCameraActor. Be sure to rename your camera.
For this, I'm going to use Hyperlapse Test. Now, let's add a new level sequence. Rename this as well if you want, and then open it up and drag the new CineCameraActor into the sequence.
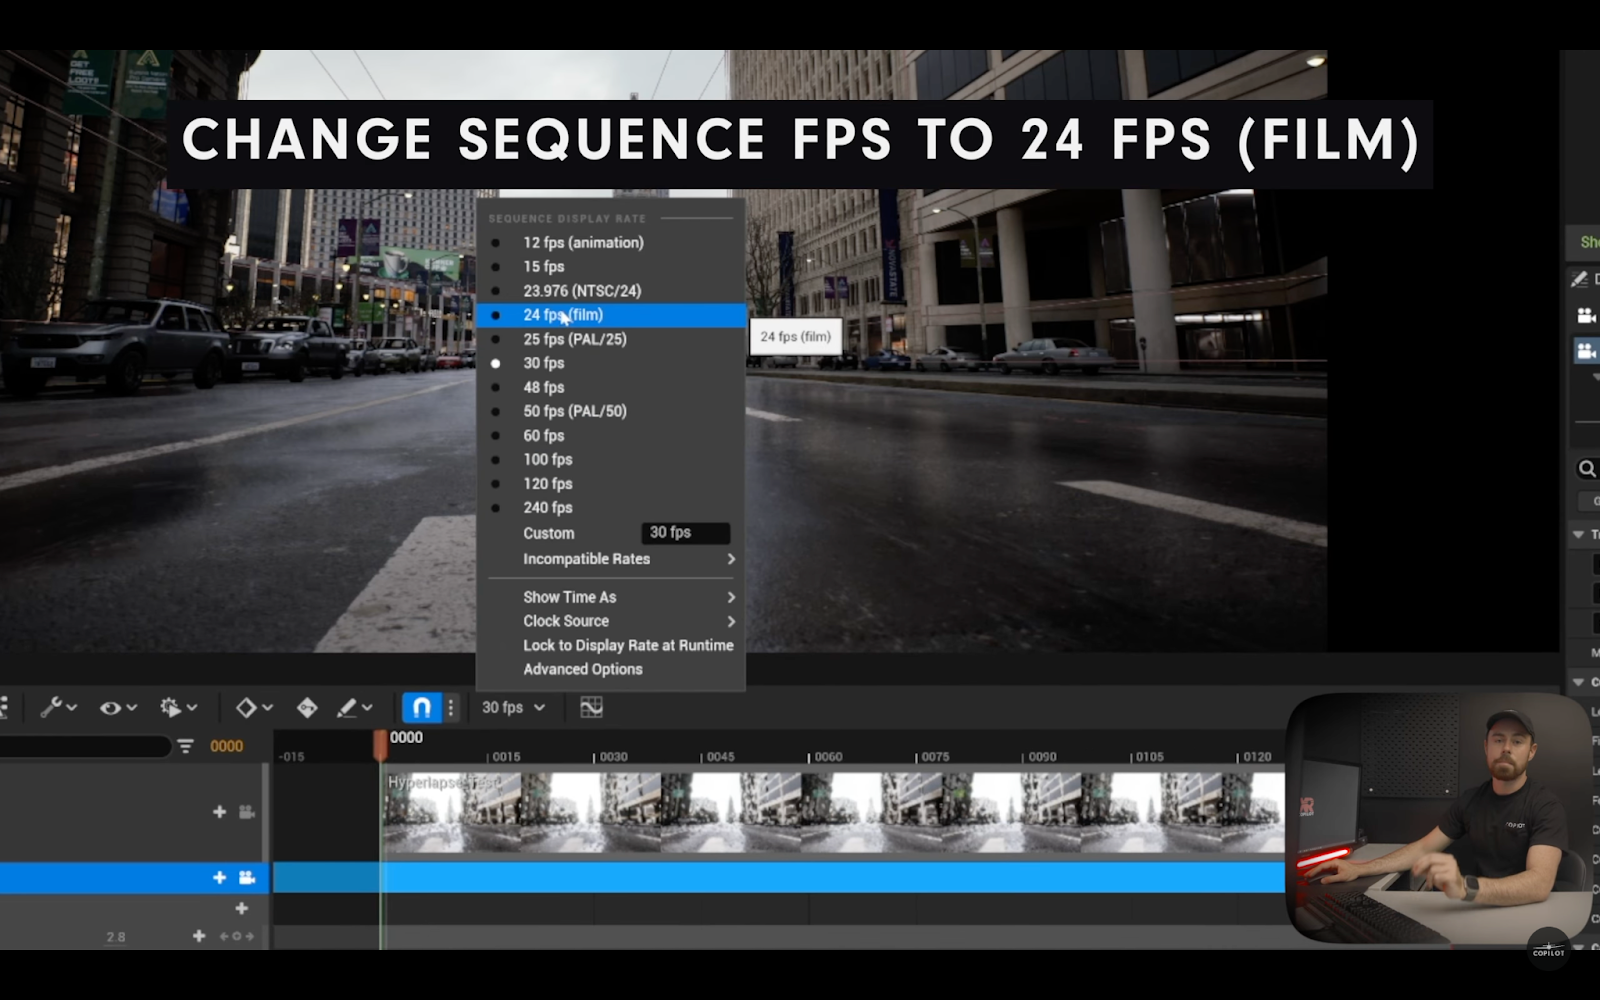
Before we start, we want to make sure that this looks the most like a real life hyperlapse, so we're going to change the frames per second for the sequence to 24 frames per second. This will allow us to get motion blur inside of the sequence.
Now let's adjust the length of the sequence. For this, I want a 10 second hyperlapse, so I'm going to adjust the length of the sequence to 240 frames.

Okay, next up, let's open up the cinematic viewport. Make sure that your camera track is selected in Sequencer, and then we're going to open up the 3x3 grid. What's nice about the cinematic viewport is that it's very similar to a camera, so if you're coming from a photography or filmmaking background, this interface should start to look really familiar.
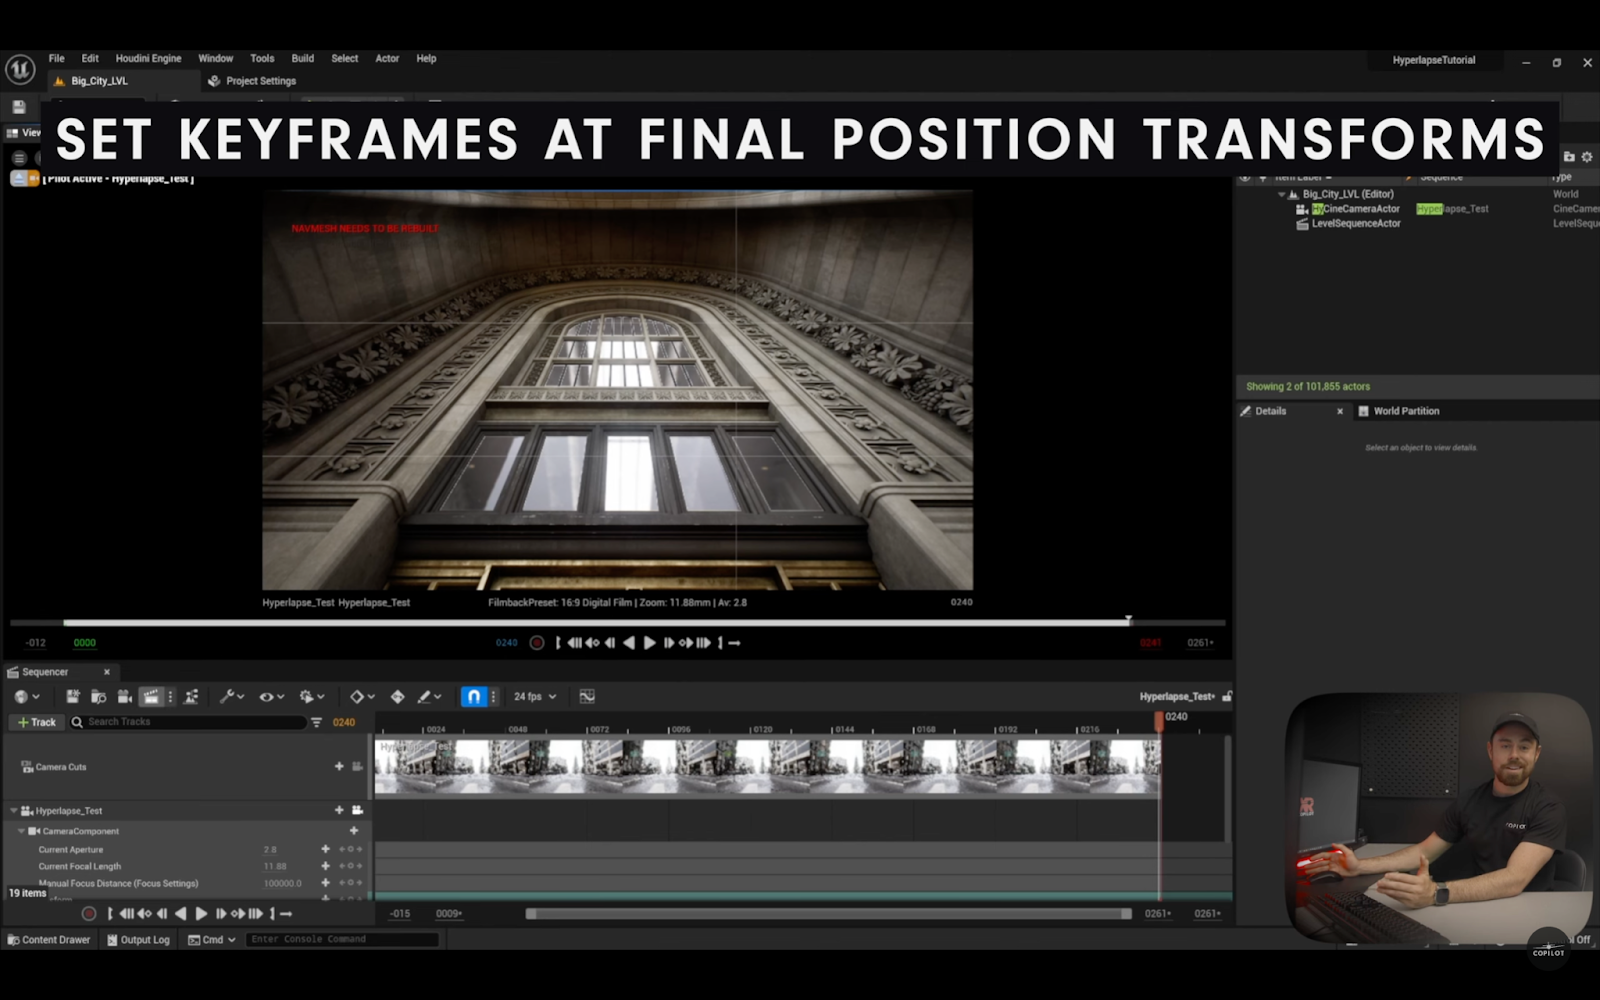
Now, we're ready to get started with the camera movement. First up, because we already selected the starting point, we're just going to set the keyframes and the transforms. All right, so we have the starting point. Now we're going to move the playhead and sequencer all the way to the end of the track.
And now it's the fun part. So you're going to use the arrows, and you're going to move the virtual camera towards the end point of the shot. When I do this, I like to visualize the actual shot itself. So this helps me see the camera movement and make sure that it looks realistic. Now that we're at the end of the shot, I'm just going to set the transform keyframes just like we did before.
Go ahead and hit play on yours. It's looking pretty good right? We have the movement of the camera done. It looks really good, but the one thing that I'm noticing on my end is that it just looks like we're in a video game engine. So one thing we can do to help with this is add motion blur.
If we open up the details panel, we're going to search for motion blur under rendering features.
For this, I'm using 0.75 for amount and 10 for target FPS. But feel free to play around with whatever works best for you. This is just what works best for my scene.
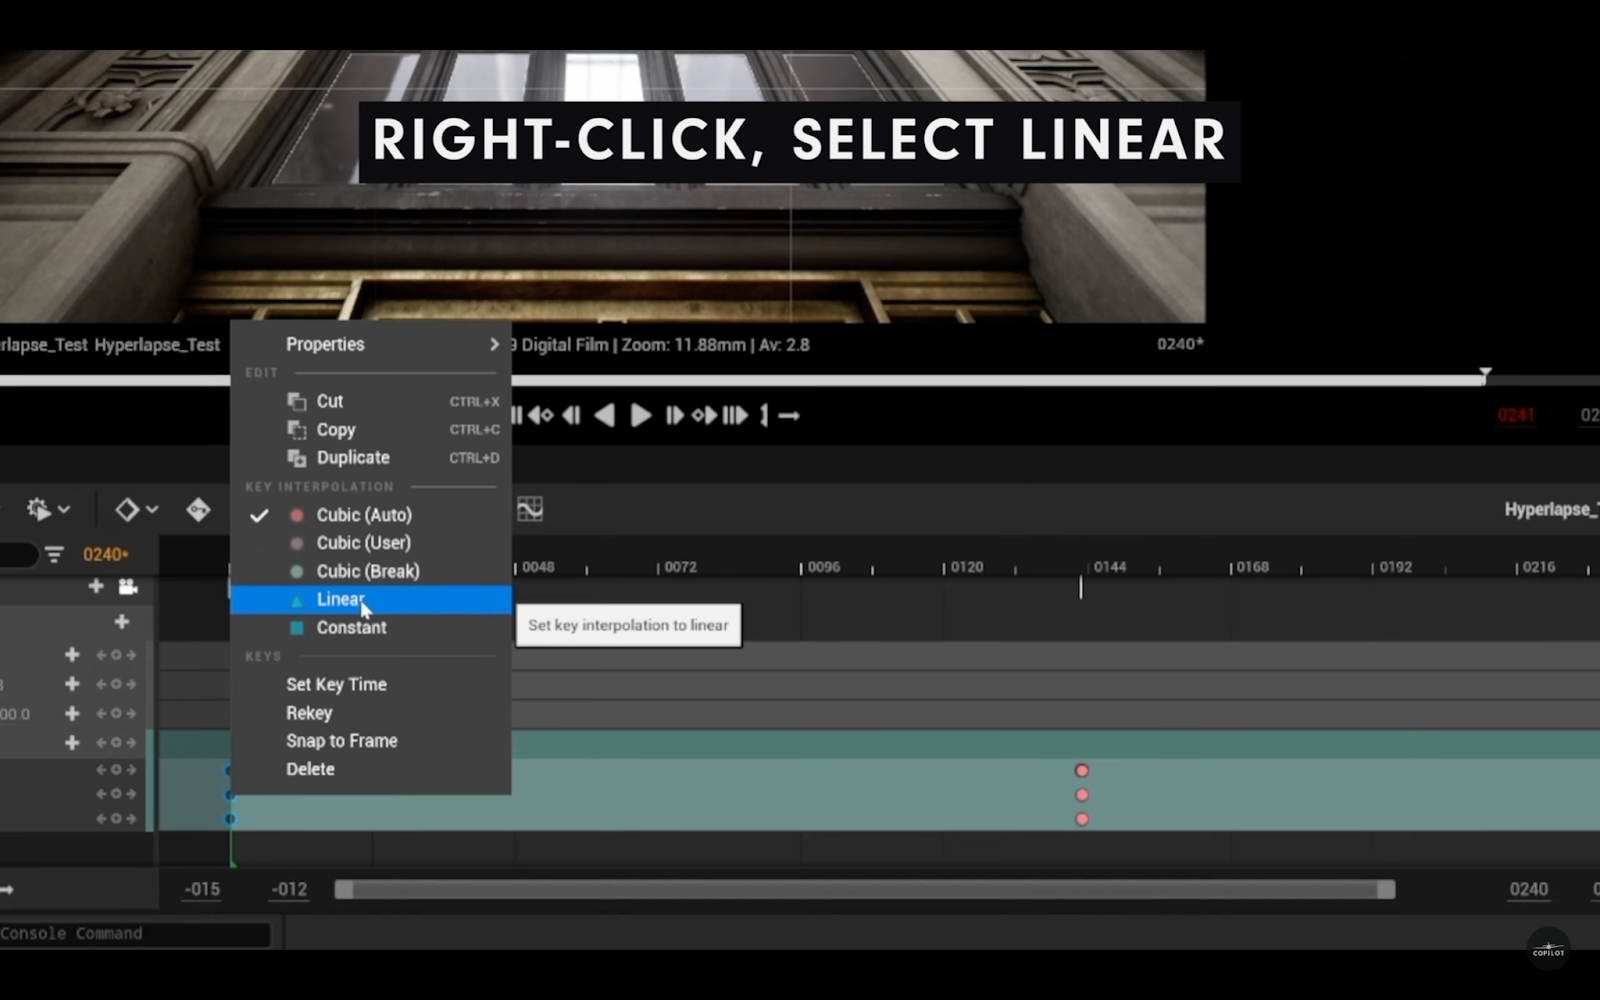
For some reason, Unreal Engine loves keeping the keyframes at a cubic interpolation. It makes the cinematics look kind of like a game cutscene so for this scene we'll want to change it to a linear key interpolation.
All right. So this is looking awesome. I'd say for 90% of you, you are done. Depending on the environment you're using, this hyperlapse looks fantastic. However, watching this back, it looks great, but you'll notice that the sun in the scene isn't moving like it would in real life.
When you shoot a time lapse, it shows the passing of time, and we don't see that here. But we're perfectionists, so let's make this perfect.
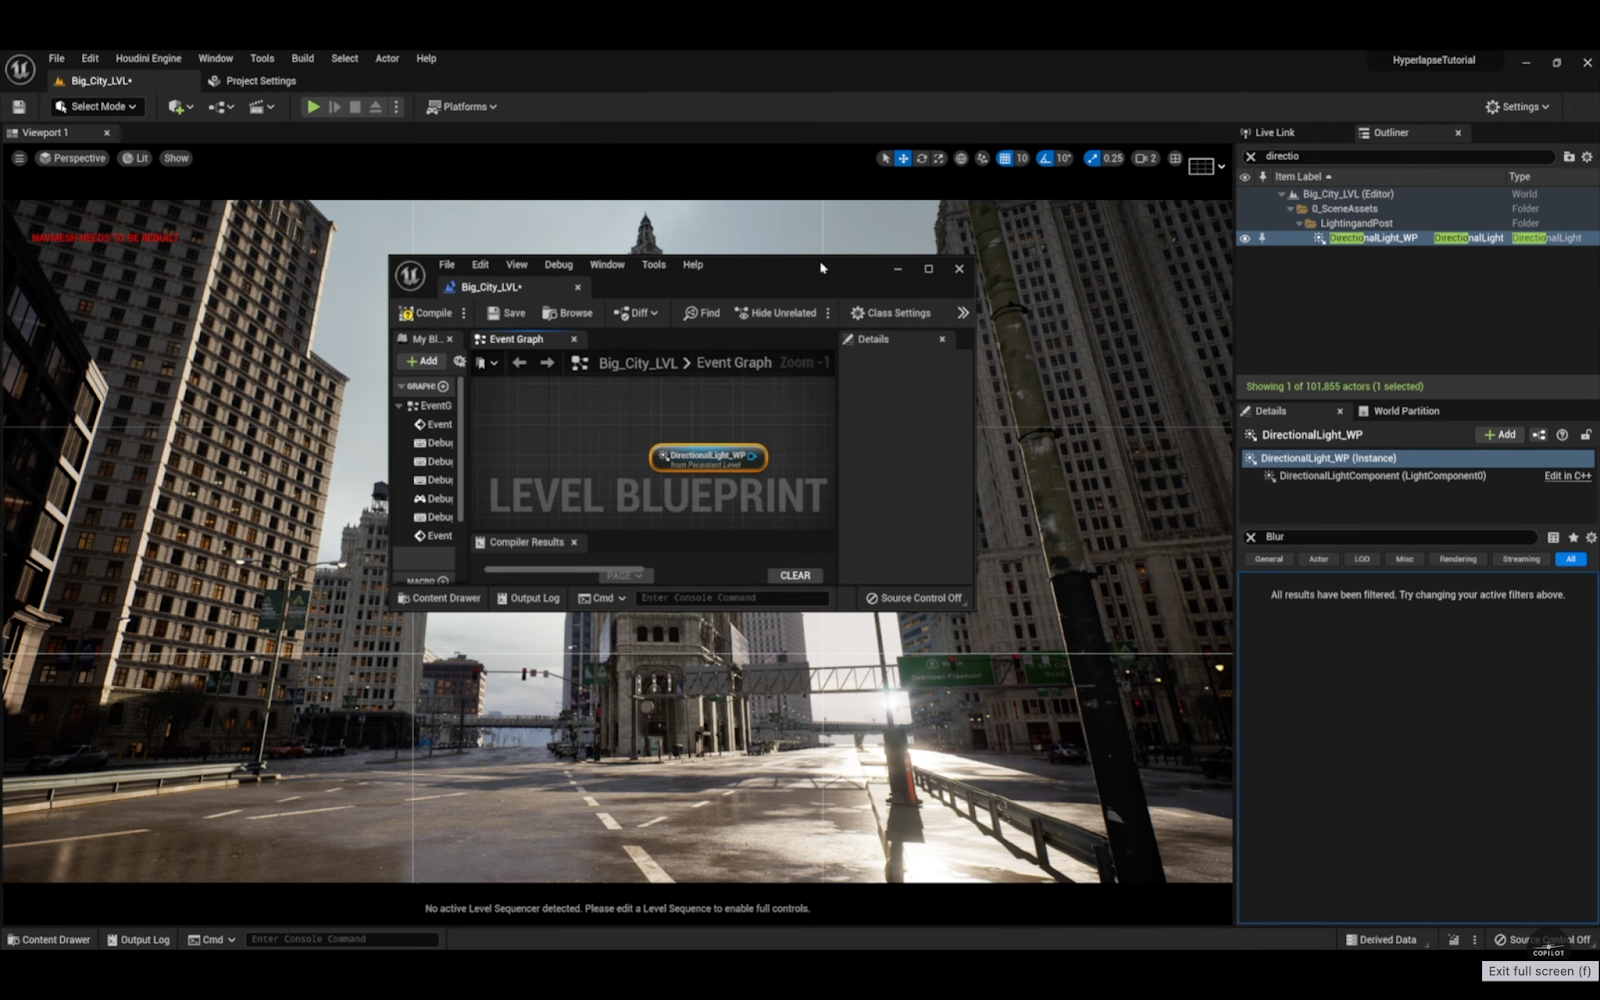
Time to jump into Blueprints. Alright, let's open up the level Blueprint. We're gonna create a new event tick. Do that by right clicking and typing in event tick.
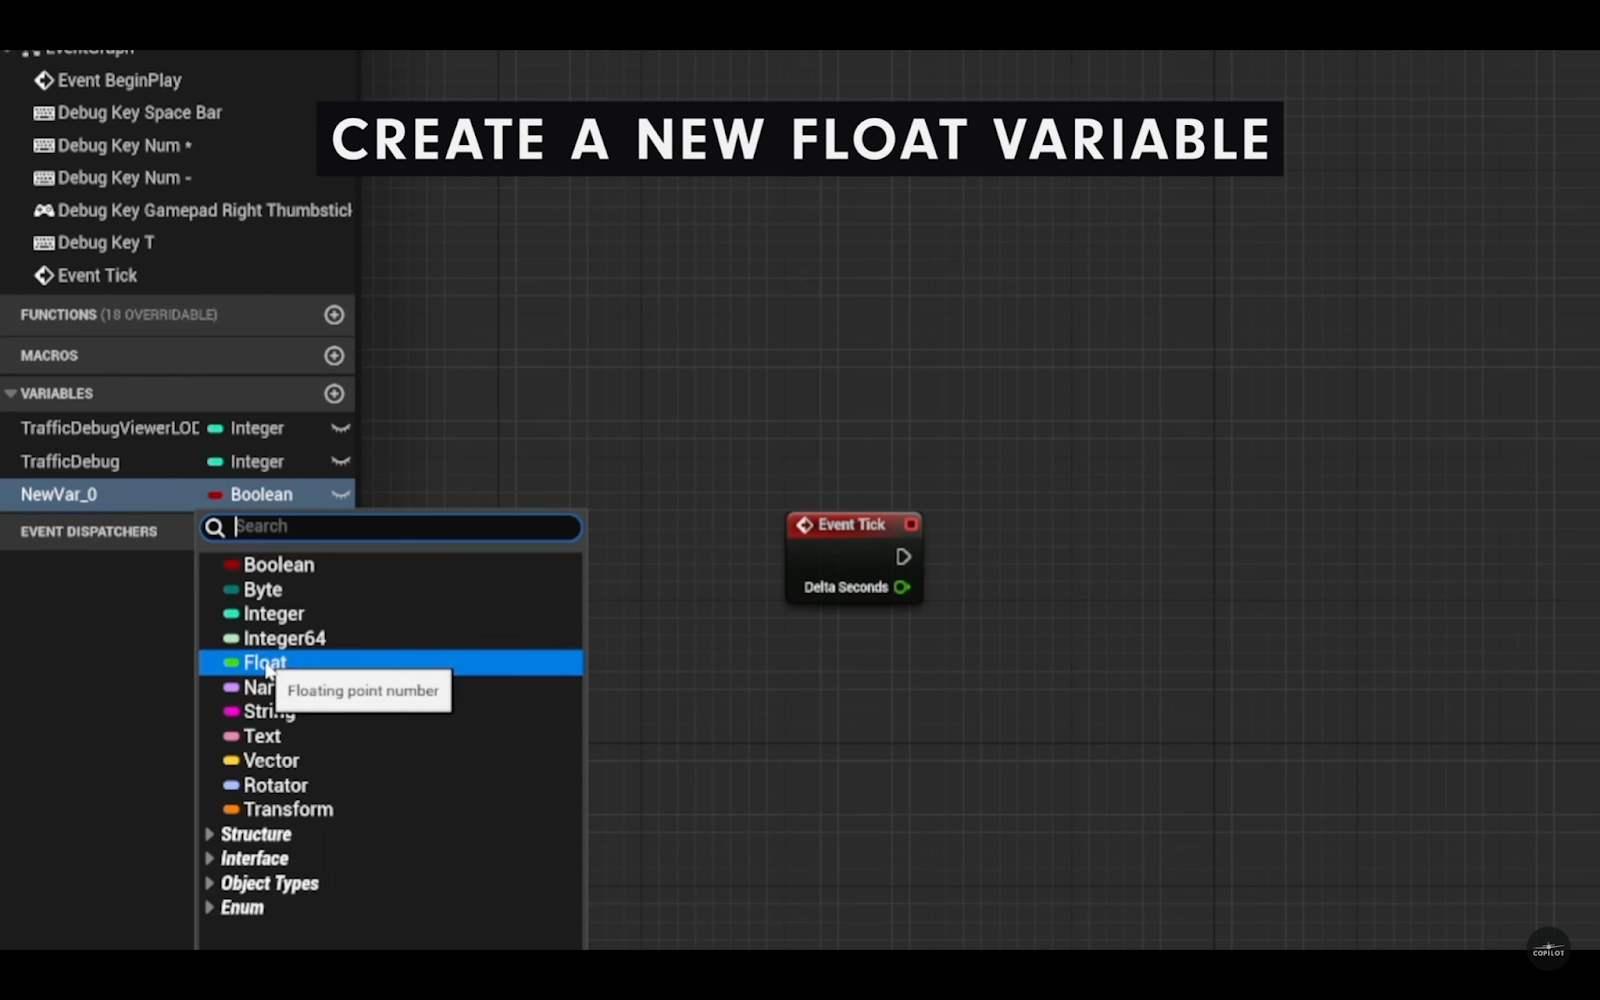
Now we're gonna create a new float variable. This is gonna be to control the sun in the scene.
Now that we've done that, let's rename it to sunSpeed.
Now let's create a multiply node to our event. And get a reference to our float variable that we just created and connect it to the second input of the multiply node.
So when we open up the detail panels on the right, you'll notice that it's not actually showing up in there. We're going to hit compile and save. And there we have it, it's sitting right there.
We'll start with a value of 10 here, and then hit compile and save again. This value changes the speed at which the day night cycle moves, so you can come back and easily adjust this value to better match the length and speed of your sequence.
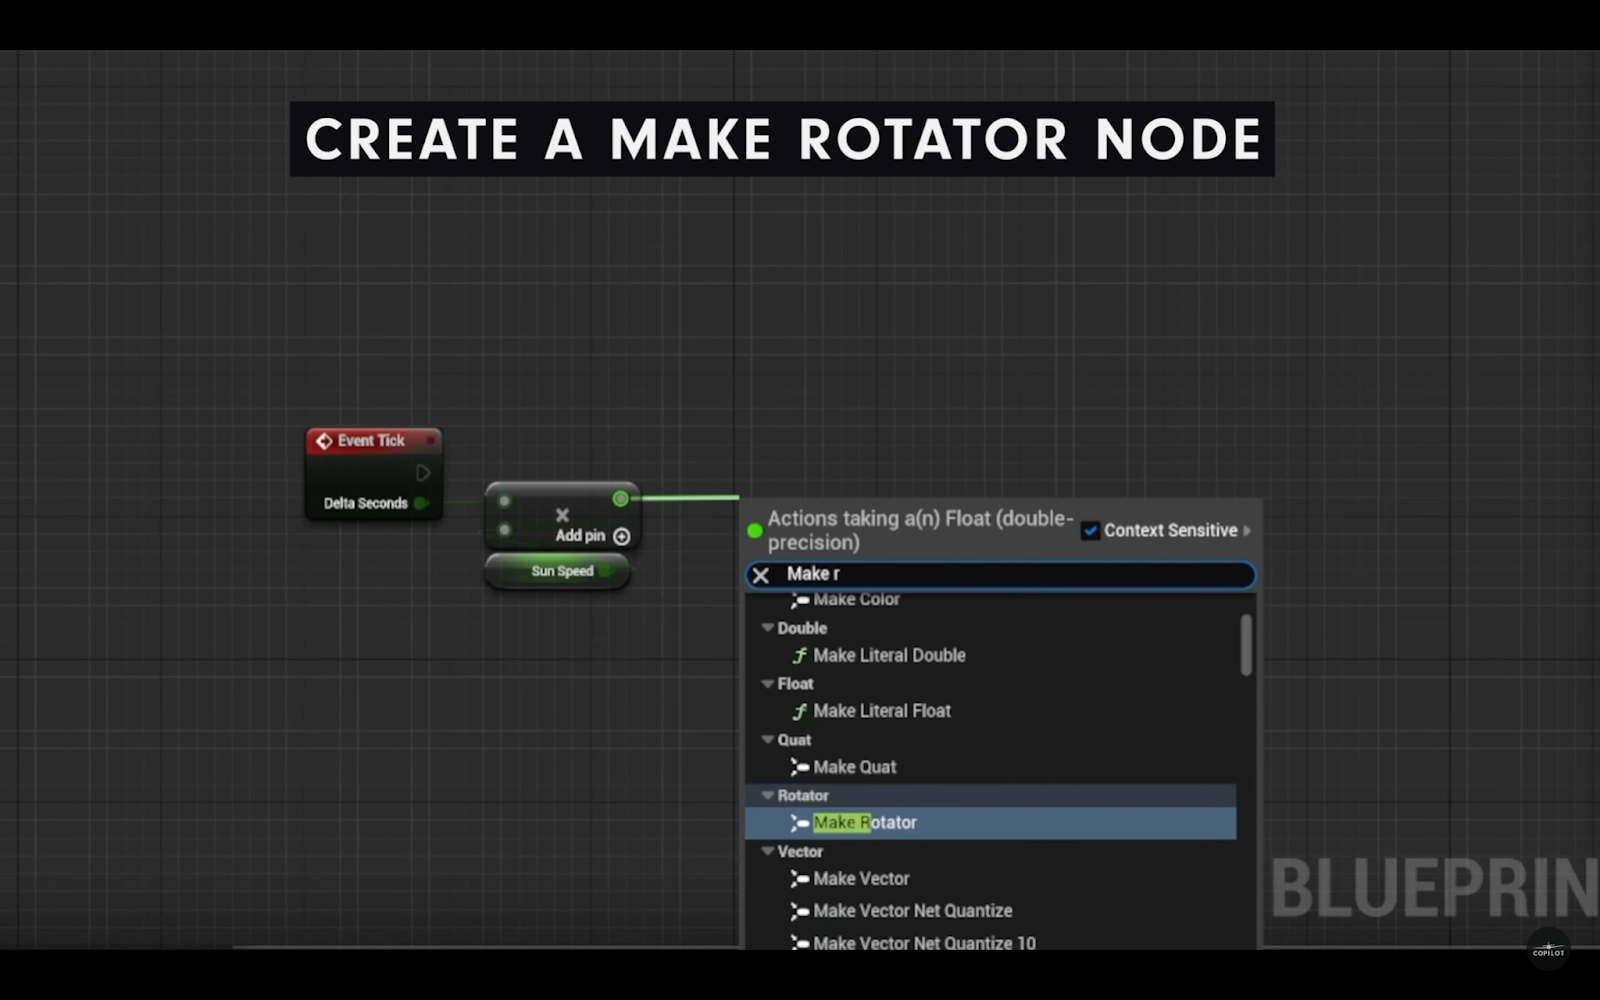
Next step is to create a rotator node. And then reconnect the multiply node to the y axis.
Now we're going to drag off the return value pin, and we're going to add a local rotation node. If it's not showing up, just turn off context sensitive.
Now we're going to go into the world outliner and get the name of the directional light that we're going to reference for this. Let's drag it into your blueprint.
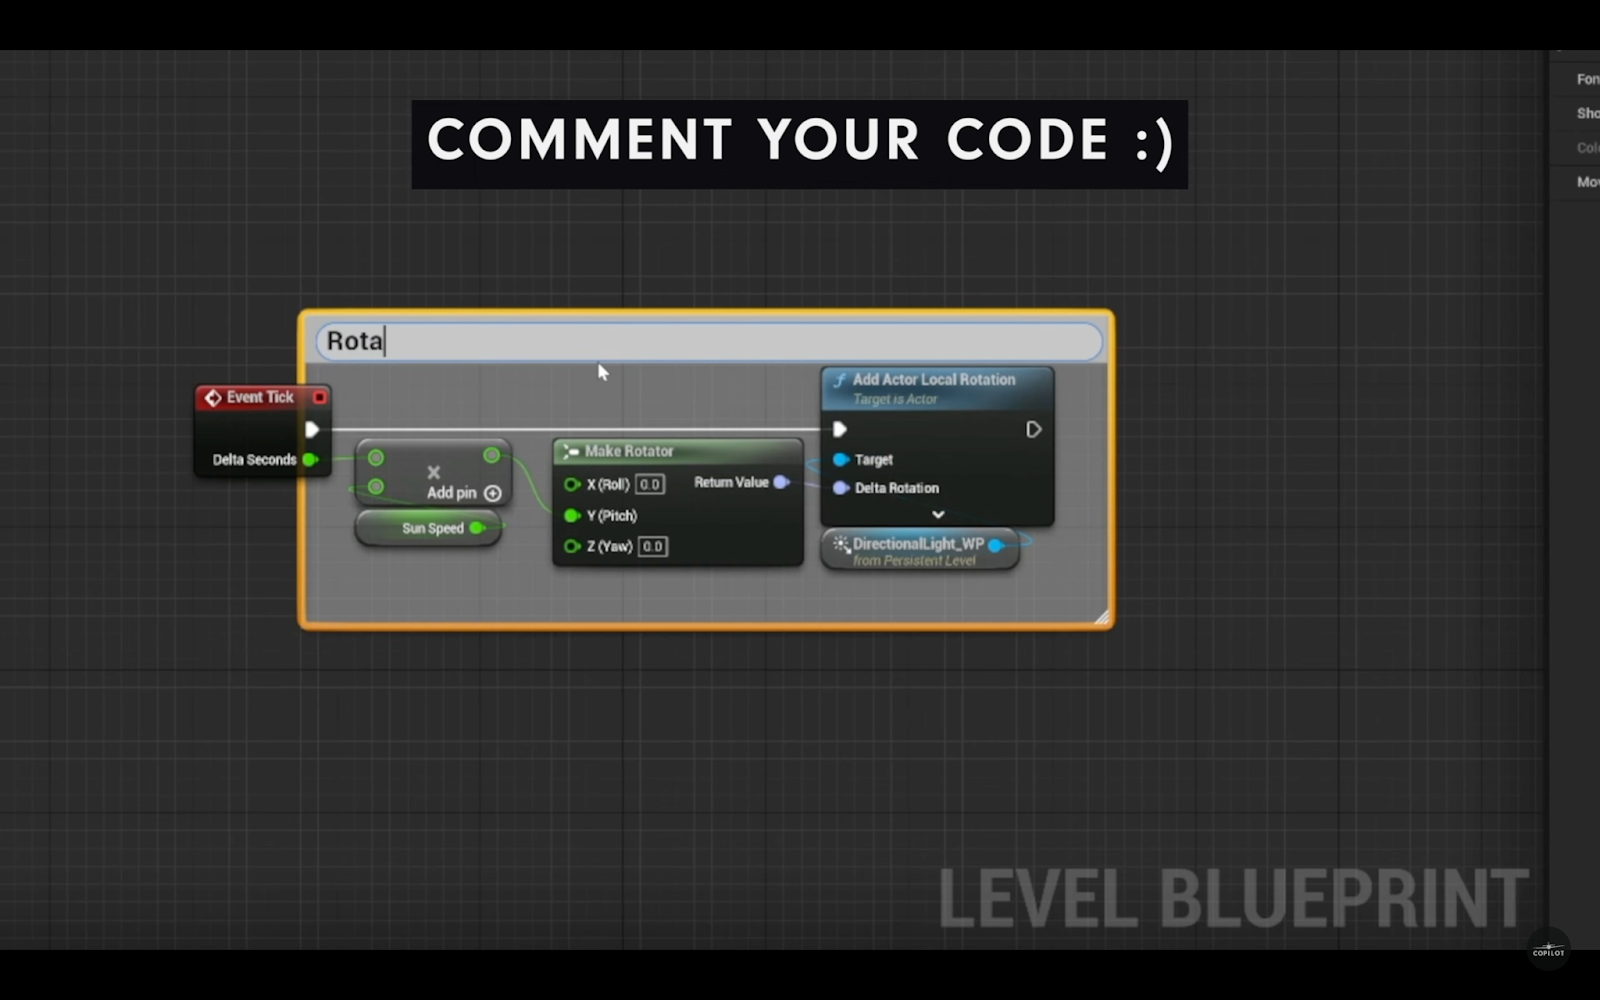
Let's connect the pin of the directional light. And connect it to the target pin of the add actor local rotation node and then connect the event node to the actor location rotation node.
Alright, so at this point it should work. The one last thing we're going to do here is comment our code. So what that means is let's just draw a box. This is essential in keeping your blueprints organized within Unreal Engine. It's not something that's necessary for this project but you should get used to doing it.
Let's compile save and then finally going back into the engine, now let's turn on simulate mode and hit play and voila! There it is. So we have the sun moving and now it looks like an actual time lapse and a pass into time as the camera's moving.
-------------------------------------
Unreal Engine 5 has undoubtedly opened up a world of creative possibilities for content creators and filmmakers. By harnessing the power of real-time rendering, you can effortlessly capture the essence of time and create visually stunning sequences. Whether you're documenting the transformation of a bustling cityscape, the mesmerizing dance of nature, or the dynamic evolution of architectural marvels, Unreal Engine allows you to tell stories in a captivating and immersive way. So, go ahead and unleash your imagination, experiment with different settings and camera movements, and let Unreal Engine 5 take your projects to new dimensions of visual storytelling.
The possibilities are truly limitless, so embrace this powerful tool and bring your visions to life like never before.